Industrious Illustrating #46 – Common Merchandise Types

Hello, and welcome back to another week of Industrious Illustrating! In previous weeks I’ve gone over profit margins and event types that artists can sell at. This week, I’m discussing a few different types of merchandise that I personally offer and their most common prices at pop culture convention Artist Alleys and online sales. Since this is another long post, I put my list underneath a Read More:

Read more: Industrious Illustrating #46 – Common Merchandise Types

Stickers ($3-8)

I used to sell stickers, but I stopped because the thin profit margin wasn’t worth how much trouble it was to market and display them in exchange for enough money to maybe buy myself a single boba per sticker. Other artists see great success with selling large volumes of them or in addition to higher priced items though. It all depends on your business strategy!
Keep in mind that some event venues will outright ban stickers and other sticky-backed items (phone grips, window decals, etc.) because of potential vandalism.

Buttons/Pins ($3-$15+)

While buttons and pins are sometimes used interchangeably as terms, they describe different types of merchandise. Buttons are typically laminated paper pressed into a metal backing with a safety pin attached on the back to secure it to clothing or other soft materials. Pins are typically wood, acrylic, metal, or enamel with an attached pin post (shaped like a metal nail) and “clutch” (typically rubber or metal) to attach it to soft materials. Pins are also typically more expensive than buttons because of the higher production cost that comes from outsourcing them to a manufacturer rather than being able to mass-produce them at home using a button press. However, these two types of merch are oftentimes displayed together on table displays using corkboard, canvas banners, vinyl cubes, etc. Prices on buttons and pins vary a lot and are generally dependent on the production cost, size, materials, etc.

I currently sell some specialty buttons shaped like coffins or made of soft plush material and a few pins either made out of metal in the shape of a bottle cap or made of responsibly sourced wood. They’re not my bestsellers, but I’ll see how they’ll do over time as I accumulate more online sales and attend more events to sell my art.

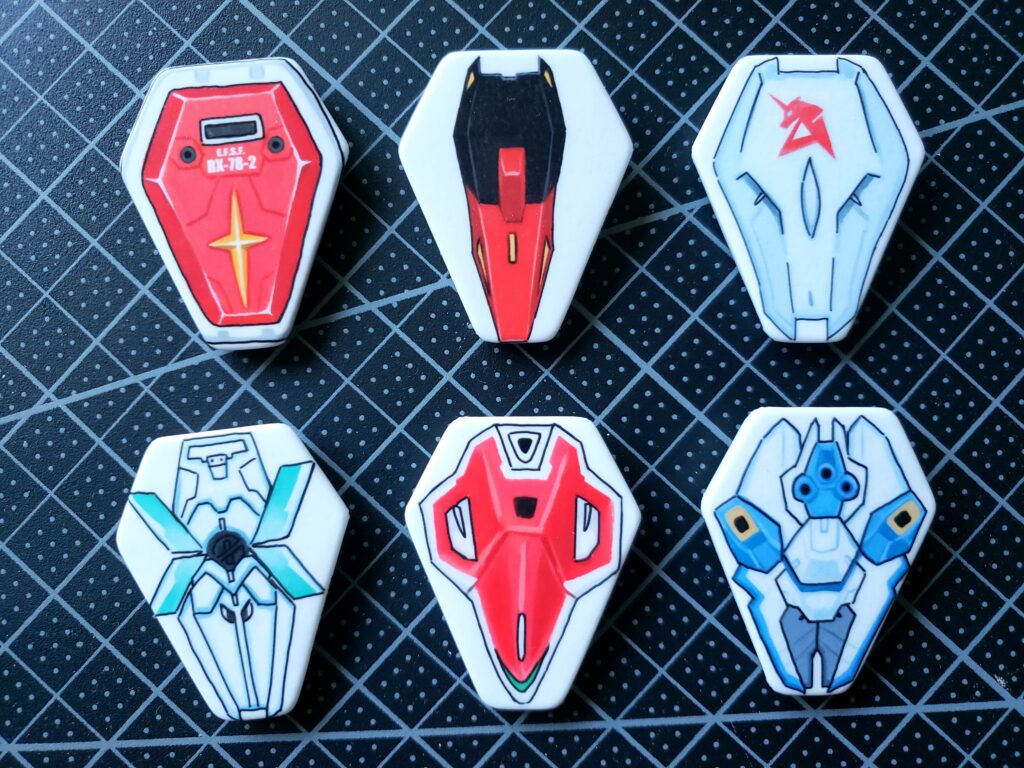
Most of my coffin-shaped button designs

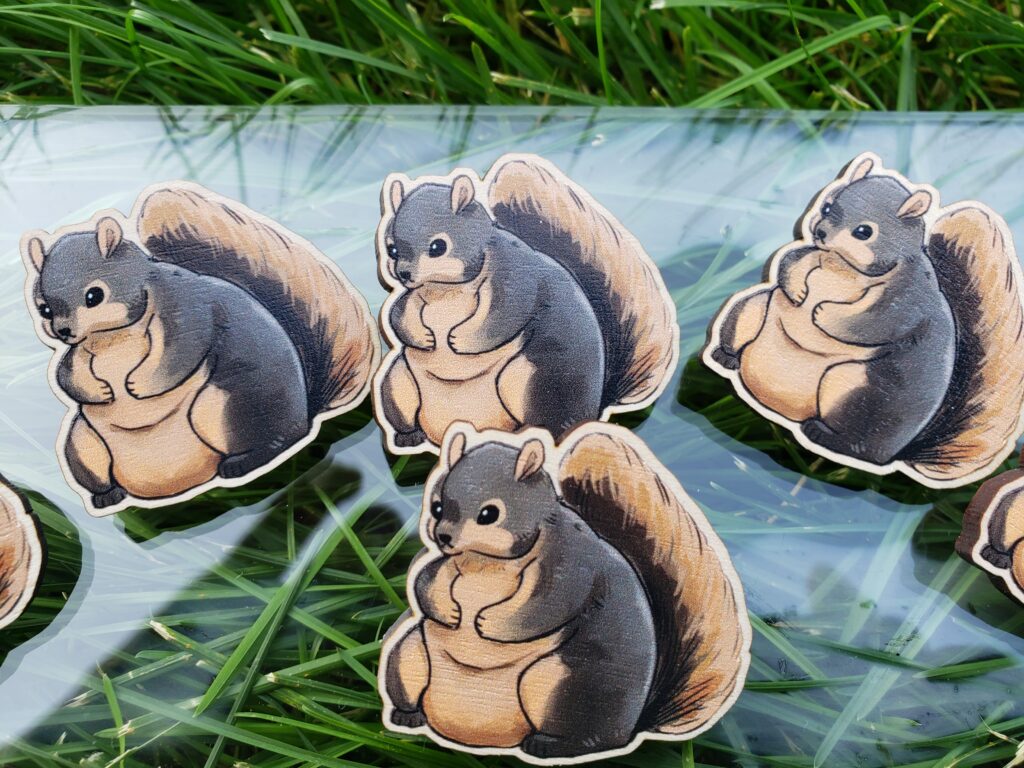
A wood pin I’ve made with a fat squirrel design.

Acrylic Charms ($8-$20+)

Acrylic charms are printed 2D artwork sealed within a (typically) laser-cut piece of acrylic cut to the artwork’s outline. The most common size of charm that I see is 2.5 inches with a clear border around the design and a hole in the top with a metal keychain clasp for hanging the charm on something else.

These typically sell for about $12-15, which may seem like a lot for such a small and simple item until you remember that acrylic charms are almost all produced in China (so, higher shipping costs than sourcing domestically like you can for prints) and are relatively sturdy and long-lasting compared to stickers or prints.

Larger charms and charms with special finishes/gimmicks such as holographic finish, foil accents, attached hanging acrylic pieces, special clasp designs, an internal compartment with shakable acrylic pieces, etc. can sell for a higher price, typically somewhere between $20-$30. Charms smaller than 2.5 inches can go for lower, typically somewhere between $8-$10. There’s also charms made of other materials such as metal, wood, PVC, and enamel, but they’re a lot less common than acrylic charms either for durability or cost reasons.

Charms sell best for me through online sales compared to other merchandise types. I assume this is because charms take up less space and that the charms I offer are in a niche that doesn’t have many other artists making small merchandise (mecha/robots) even when compared to the broader internet.

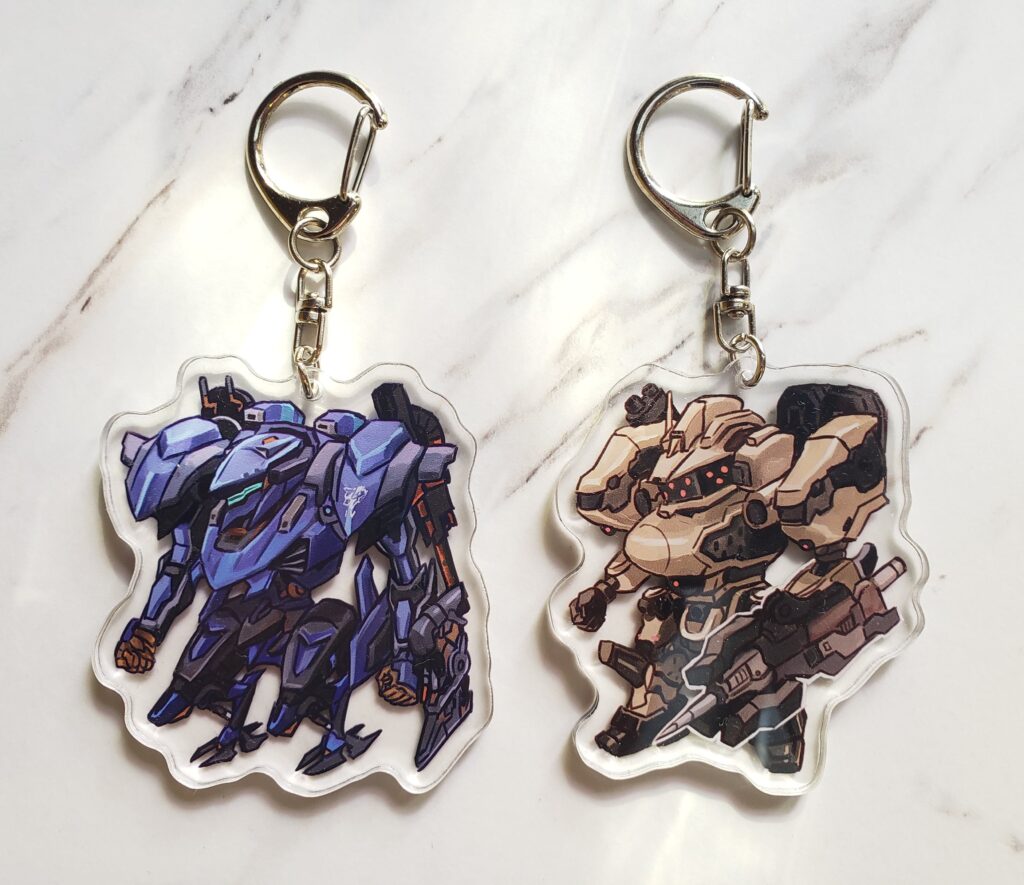
Two recent acrylic charm designs I made that far surpassed my sales expectations when I listed them online

Prints ($10-$25+)

Prints without specialty finishes like holographic (rainbow crystal) laminate or metallic spot foil accents are fairly cheap to produce, totaling about 1 dollar per print for 11×17 inch prints and even lower for smaller prints like 8.5×11″ or 4×6″ prints. Their high price point compared to their production cost comes from the length of time a typical print artwork takes compared to smaller merchandise with simpler designs, and also their relative large size compared to other forms of cheap-to-produce merch such as stickers and buttons. This still means that their profit margins are much better compared to other merchandise types, which also means that competition in the print-selling market is extremely competitive, especially in Artist Alley.

The most common prices I see for common print sizes at pop culture conventions is $10 for 4×6/5×7 prints, $15 for 8×10/8.5×11″ prints, $20-$25 for 11×17/12×18″ prints, and much higher for anything larger. Specialty finishes up the prices per print size by at least $5, though in my experience customers are willing to pay an additional $10 or more for a special shiny-looking print. However, these prices are actually relatively low compared to how much fine artists charge for prints at fine art events, as the typical attendee there is expecting higher prices compared to the average anime or comic con attendee.

My best-seller at cons is by far prints, though prints also account for a majority of the merchandise that I offer in the first place.

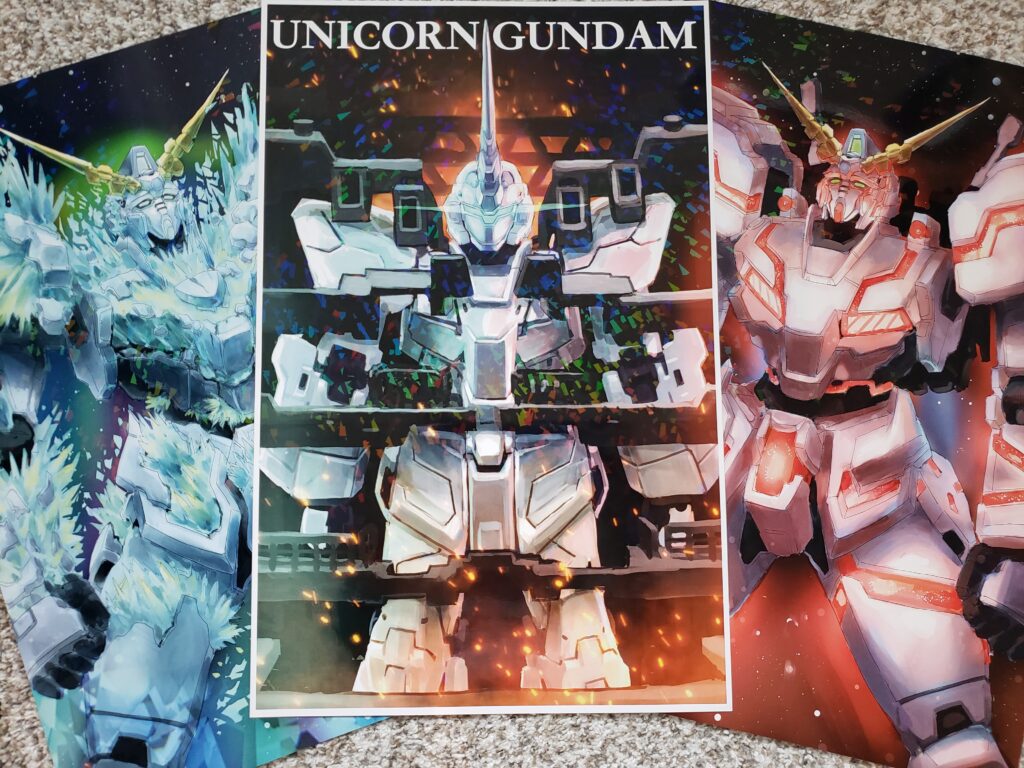
Examples of holographic finish prints that I sell online and at my Artist Alley table

Apparel ($20+)

I don’t personally sell apparel because of the high cost per unit (at least $10 per printed shirt) and the amount of stock I’d have to order for sizes S through XL without knowing if it’d actually sell, but there’s some artists who sell shirts or sweaters either printed on by a third-party manufacturer or that they screenprint on themselves. There’s a decent amount of potential money to be made by selling apparel since it’s not a common Artist Alley item and a lot of customers see appeal in functional items, but it also takes up a lot of storage space (a problem especially for weight restrictions on flights for faraway events) and you end up having to compete on price with fast-fashion corporations who can afford razor-thin profit margins far more than an independent artist can.

Other merchandise?

Keep in mind that this list is far from exhaustive and that there’s lots of other things that you can either create yourself or get your art printed on! This is just meant as a quick introduction/overview of commonly sold merchandise types in the specific type of small art business that I currently work in.

Remember that the advantages of selling mass-produced merchandise based on an original drawing instead of focusing on selling one-of-a-kind original art pieces are that you can reuse your designs infinitely and across various types of merchandise to potentially make lots of sales across a long period of time from a few hours of labor. Your budget and time are the true limiting factors when it comes to what kind of merchandise you can create and offer as an independent artist!

Anyway, Motor City Comic Con is next weekend (November 10-12), so I’m waiting on several merchandise orders to ship in ahead of that con. I’ll be debuting new merchandise like rubber deskmats and double foil prints to experiment with what my customer base likes best, and I’ll be sure to write a column after that convention talking about how my first comic con tabling experience went!

S3 Scribble #4: Closer to Fine

“And I went to the doctor, I went to the mountains, I looked to the children, I drank from the fountains,”

It’s the first of November of my senior year. “What’s next?” I’ve been asked, and the truth is, I’m not quite sure. I just submitted yet another application that may or may not determine the course of my future, and I’ve been riddled with self-doubt (which is surprising and disorienting, because I tend to be confident and decently sure of myself). Accepting the fact that there are many things out of my control at the moment is a challenge. Even without the self-doubt and the other responsibilities that school and life entail, the fact that I don’t have any idea what my life will be like in just one year from now is something I must grapple with constantly.

“There’s more than one answer to these questions pointing me in a crooked line.”

But, really, must I grapple with it? The Indigo Girls’ “Closer to Fine” reminds me that in order to be happy, I need to let go of the unknown. I can try my best to prepare myself for the future, but knowing what will happen is simply impossible. Therefore, the best I can do is let myself enjoy where I am now and enjoy where life takes me. I don’t need to grapple – I need to accept that there are unknowable things, and then I need to let them go. 

“And the less I seek my source for some definitive,”

When one door closes, another door opens, and, so far, things have worked out. Maybe not in the way that I had hoped or anticipated that they would, but things have worked out nonetheless. It is not my job to worry about what is beyond my control. It’s my job to take advantage of opportunities – and create opportunities – for myself. It’s my job to enjoy the ride.

“Closer I am to fine.”

Listen to Closer to Fine by The Indigo Girls here: https://www.youtube.com/watch?v=1HWV5hq4Bh8

Wolverine Stew: Happy Halloween!

My nights this time of year are made of

Home-made cemeteries and their hundred lights

Laughing in the forest made of

Bony twenty-sided dice

The candy corn tree and strings

(both web and metal)

Of an open mic echoing in halls I once walked

My own breath becoming fog in

The lamplit snow falling as we passed out candy from

An antique plastic pumpkin

Watching together as skeletons dance in gourds

Every porch lined with grinning faces

Their night-sky mold interior lit by electric candles

The sky clearing just in time to see the Hunter’s

Moon hanging in those last moments of running

In the dark, in my mask, in the cold, content

I will wish everyone I know and those I pass

That feeling of being at home in all this

My ideal is to be a worm-infested caramel apple

Hoping to be sickly sweet and full of life

Sometimes I worry I make a ghost of myself

But tonight, I get to come back

And this time, I’ll remain a little longer  

The Indian Artist, Fine Year: The Power of Giving In

Good afternoon everybody! I hope that you are all doing well and have had a wonderful Monday thus far. I am taking a printmaking class this semester and I thought that I would share my most recent art piece. This class has challenged me more than I had anticipated. In many ways it has been a welcome way for me to channel my devotion to technical skill and intricate details. In more ways than one, however, it has pushed me to be okay with making mistakes, give in to the process of printing, and welcome whatever comes.

I tried monotype printing for the first time. I have experience in relief printing and linoleum carving, but learning the loose nature of monotype was daunting at first. Of course, I knew I wanted to stick true to my cultural repertoire and decided to draw feet in a classical Bharatanatyam pose. Monotype prints allow artists to use various materials, techniques, and layers to create interesting textural pieces. I found that though I attacked the project with a level of planning and vigor, there was always something that went wrong. Out of eight prints, I came out of it only really happy with one.

However, at the end, there was something incredibly freeing about the entire process. I was excited when I got the intended result, but when I didn’t I was willing to go with the mess ups. It is in projects like these that I learn the most about myself and the process. Who knew that through the simplest moments I would learn the greatest lessons. It is important to make work that we are not proud of! If we let go of the yearning for perfectionism, we get the chance to experiment, to explore in ways that we have never allowed ourselves to before. There is no such thing as perfectionism. Through taking a leap of faith, we may find a diamond in the rough.

Until next week,

Riya

Instagram@riya_agg.art

Portfolio: https://theindianartist.weebly.com/ 

Fiber Fridays #2: Dying Fibers

Hello everyone!
This post is coming to you a bit late due to wifi issues so I apologize for the delay! This week I want to discuss with you guys what it is like to dye your own fibers for your work. Spoiler alert! It’s hard, at least in my own experience. Getting the perfect shade that you are imagining in your head can prove to be difficult.

My original intention for this fabric was to weave a really long sheet on a loom and use it to sew little purses and bags. I imagined almost “forest-ish” colors, such as deep orange, dark green, and a pale yellow for my weft. I wanted to weave in brown and beige colors and have a soft look to it.

I had to start out by measuring yards upon yards of threads for my warp , and spending hours in the weaving studio spinning them into the perfect measurements. I then took them to the dye studio, where things quickly felt more complicated. I had to mix the appropriate amounts of each dye with other chemicals in order to get the colors I wanted, and I had never dyed anything besides my hair.

When I finally got the bundles of threads into their respective dye buckets, I felt confident. The colors looked dark and moody, exactly what I wanted! I let these colors sit longer than the yellow. The yellow seemed like if I just pulled it out quickly it would be the lighter yellow I wanted.

The above photo was the result. I was embarrassed. These look straight out of a lemon lime ad. They looked citrus themed, far from what I ever wanted to work with. Far from anything I even care about. I was stuck on how I could make this work. I turned to a color palette generator, and put in the colors I had created in the fibers. The computer gave me a variety of different colors that could work as the weft. I decided to turn the cloth into an experimental project. At random intervals, the fabric would have a new colored weft.

Shifting gears with this project is what I believe really saved it. I ended up loving the end cloth and was able to use ti for the small bags that I wanted to use it for, as well as reupholstering a vanity chair. Weaving is always a rough journey for me, and dying my own fibers made it even harder. I would do it again though, and recommend it to others who would like to try!
See you guys later this week for actual Fiber Fridays!
-Marissa
Below is some of the final products:

MediaScape Musings #2 : Kiss The Earth

An ode to nature’s gentle touch,
Where the lips of dawn meet meadows
in a loving clutch,
A warm and caring grace,

The soul returns to its actual, tranquil space.

Today, I had the pleasure of sharing my most recent photography project -“Kiss The Earth!” This project is an exploration of the profound connection between humanity and nature, a visual journey that seeks to rekindle that timeless bond, reminding us to return to our roots.

The inspiration for this project came from a deep yearning to capture the raw and unadulterated essence of nature. It’s all too easy to forget our intrinsic connection to the natural world. “Kiss The Earth” serves as a visual reminder, urging us to reconnect with the Earth’s beauty and power. Through my lens, I aimed to remind viewers to embrace the simplicity and grandeur of nature and rediscover their own beginnings.

# find more of my photography works on Instagram: @dsu.photoart