Fiber Fridays #6 : Sentro Knitting Machine

Hey everyone!

In order to complete my Christmas gifts for family members this year, I invested in a Sentro knitting machine. This is going to be my honest review of the machine and what it can and can’t do.

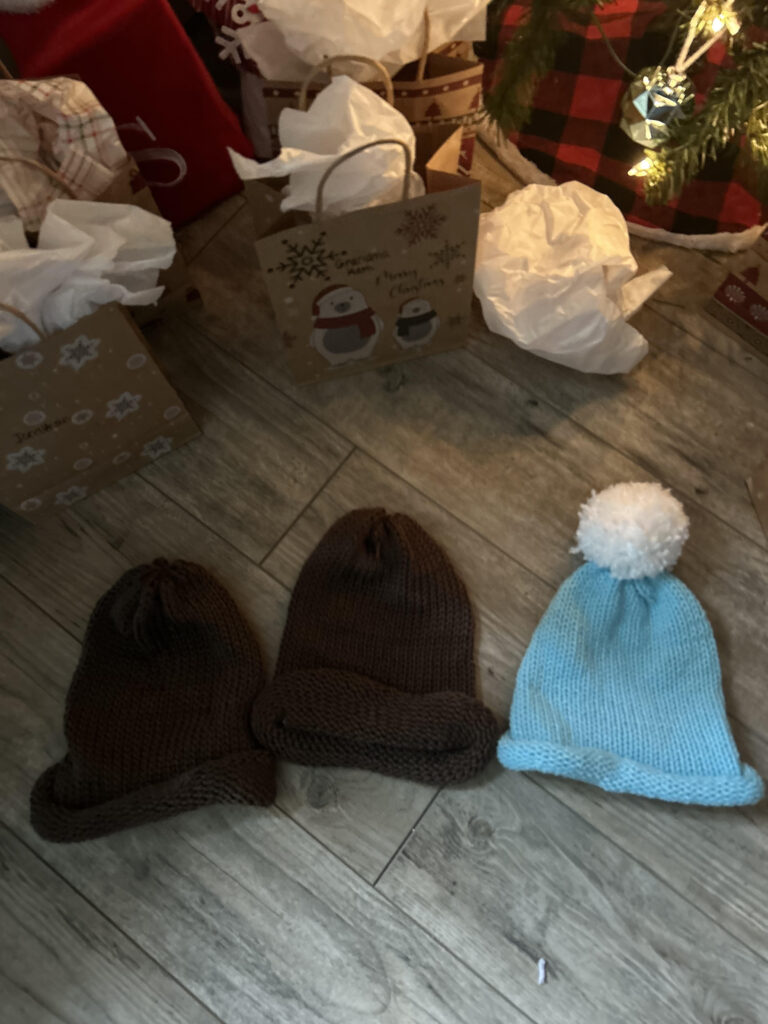
I purchased the 48 needle machine knowing that the majority of the crafts I would be making for Christmas would be using the tube setting. This ended up being a really easy and intuitive setting on the machine. The machine has little suction cup feet that will keep it planted to the floor or a counter top while you crank the handle. I was able to hang out with my partner and watch television while I worked.

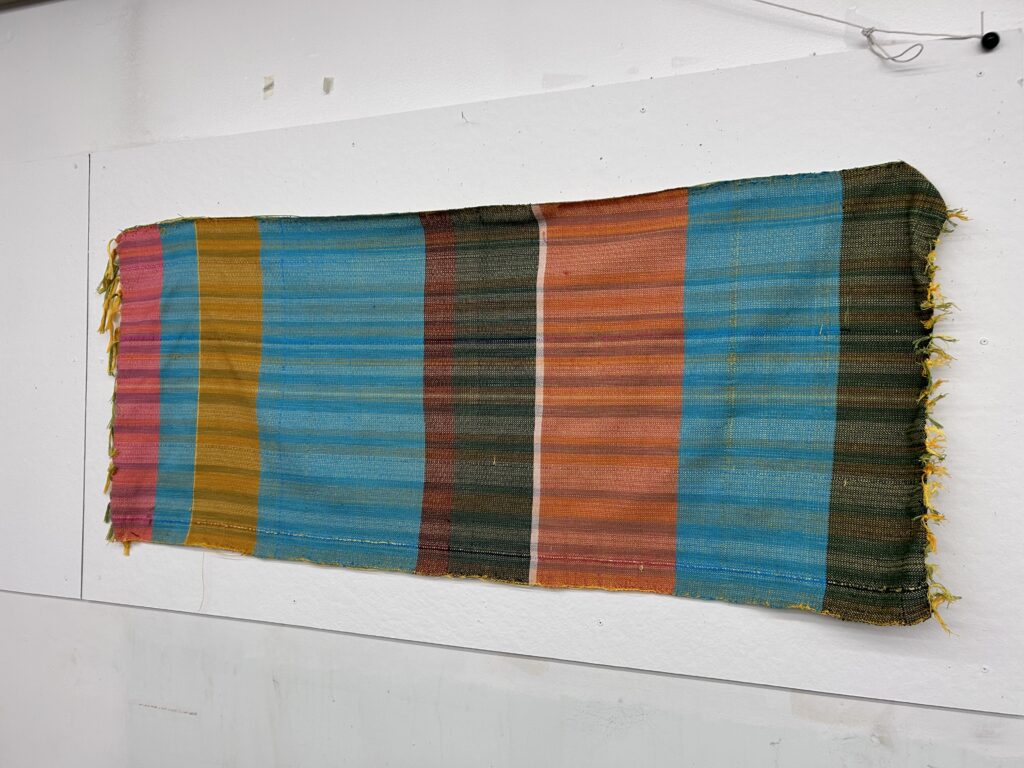
I used a thicker acrylic yarn which the machine seemed able to turn into a really pretty knit fabric. When i had attempted to use a finer self-striping yarn (which the machine advertises that it can handle) the stitches were much too far apart for the fabric to be usable. When one uses yarn that is too thick for the machine, the hooks will get caught on the yarn, causing the user to be unable to turn the handle. When this happens, there is damage occurring to the handle. It is important to pick a weight of yarn that will work well with both your project and the machine.

I was able to create many hats that my family members seemed to love which this machine. When I had ordered the machine from amazon, it came with four different sized puff makers, a few skeins of yarn, a crochet hook and a few darning needles.

This machine sells for around $50 and is a good investment if you see it as something that you might use often. Keep in mind the yarn weight restrictions and make sure to pick a a machine that has the right amount of needles for the types of crafts that you would like to create.

I personally really enjoy it and think it makes crafting really efficient and more relaxed.

I hope this review helped anyone in their decision!

See you next week,

Marissa

Fiber Fridays #4: Freehand Crochet

Difficulty: Hard

Hey everyone!
I have been so busy as of late working on a super big crochet project. The Stamps undergraduate exhibition deadline is coming up and I am binging a bunch of Gen Z podcasts and crocheting nonstop. The theme this year for the exhibition is “resistance”. I want to save getting super into the meaning of my project in February, after the exhibition.
This week, since I am doing so much freehand crochet, I figured that I could show you some of the process work, and try to give as many tips and tricks as I can. In order to under stand how to freehand crochet, one must know how to read and execute crochet patterns. Knowing how these patterns form and hope the stitches interact with one another is extremely important in developing your own design with no instruction. You must have a strong grasp on how increasing and decreasing stitches can affect your work. You also might need to know how to sew depending on your design, or learn how to mattress stitch panels together. I would recommend that you know how to crochet in the round.

On the most basic level, what I am trying to achieve physically with this piece is a stylized rendition of a geode. I am a geology minor and like to incorporate that interest into my work. You can start out your freehand crochet however you’d like, but since I know the general shape of the form that I want, I started with an outer border and worked my way in. I am using scrap/ reclaimed yarn/ donated yarn to create this piece. You can see in the picture below the general idea of where i’m going with this.
I’ll post the final piece after the exhibition.
If you have any additional questions, comment below!
See you next Friday,
Marissa

Fiber Fridays #3: Tapestry Crochet

Hello everyone!
This week I wanted to focus on tapestry crochet patterns and explain how to read them. These patterns can also be called alpha patterns. Alpha patterns are gridded images (such as pixel art) that can be directly translated into a 1:1 crochet pattern. These crochet patterns are straightforward once you know how to change your colors as you work. I personally choose to use a 5 mm hook for these in generic acrylic cheap scrap yarn that I find. With just a couple rows of single crochet, you can take your piece visually to the next level.

For my example, I crocheted a dinosaur. This was my first attempt at making an alpha pattern, so I believe it came out well! My color changes didn’t turn out exactly as I had hoped, but those will become cleaner over time and with more practice. I chose to use a single crochet for every square in the pattern. It is best to use tighter tension when crocheting this way. This creates a tighter crocheted image which will keep your lines cleaner. Tapestry patterns can come in any type of image you’d like to create. You can look up pre-made images that have already been turned into pixels, or you can pixelate your own images at home. These are super cute and can be applied to sweaters, bags, blankets, etc to give a little more detail. They can also be used as wall hanging decorations just as they are.

Here I have included more advanced samples if anyone would like a starting point for ideas! Pinterest is a great resource to find different patterns for every genre.
I would personally like to create more of these and use them in my “scrapbooking” sculptural work. I would like to create a bunch of images and sew them together to make a story. I am currently collecting small tapestries , granny squares, and amigurumi figures that I have created over time to hopefully be able to consolidate them all into one great piece. The incorporation of 3D forms could also be really cool to layer amongst the pieces. I also really like sculptural wearables and plan to work more on the human form. Applying these illustrative images to garments could also be really interesting.
I encourage you to try out this method and let me know how it goes for you in the comments!
See you next week,
Marissa

Fiber Fridays #2: Dying Fibers

Hello everyone!
This post is coming to you a bit late due to wifi issues so I apologize for the delay! This week I want to discuss with you guys what it is like to dye your own fibers for your work. Spoiler alert! It’s hard, at least in my own experience. Getting the perfect shade that you are imagining in your head can prove to be difficult.

My original intention for this fabric was to weave a really long sheet on a loom and use it to sew little purses and bags. I imagined almost “forest-ish” colors, such as deep orange, dark green, and a pale yellow for my weft. I wanted to weave in brown and beige colors and have a soft look to it.

I had to start out by measuring yards upon yards of threads for my warp , and spending hours in the weaving studio spinning them into the perfect measurements. I then took them to the dye studio, where things quickly felt more complicated. I had to mix the appropriate amounts of each dye with other chemicals in order to get the colors I wanted, and I had never dyed anything besides my hair.

When I finally got the bundles of threads into their respective dye buckets, I felt confident. The colors looked dark and moody, exactly what I wanted! I let these colors sit longer than the yellow. The yellow seemed like if I just pulled it out quickly it would be the lighter yellow I wanted.

The above photo was the result. I was embarrassed. These look straight out of a lemon lime ad. They looked citrus themed, far from what I ever wanted to work with. Far from anything I even care about. I was stuck on how I could make this work. I turned to a color palette generator, and put in the colors I had created in the fibers. The computer gave me a variety of different colors that could work as the weft. I decided to turn the cloth into an experimental project. At random intervals, the fabric would have a new colored weft.

Shifting gears with this project is what I believe really saved it. I ended up loving the end cloth and was able to use ti for the small bags that I wanted to use it for, as well as reupholstering a vanity chair. Weaving is always a rough journey for me, and dying my own fibers made it even harder. I would do it again though, and recommend it to others who would like to try!
See you guys later this week for actual Fiber Fridays!
-Marissa
Below is some of the final products:

Fiber Fridays: Fabric Slashing + Intro

Hello everyone!
My name is Marissa Woods and I am so excited to be returning to Arts, ink. this year as an artist and writer. Last year my content primarily focused on my illustration work and relatable content for students on campus. This year, I am taking the leap of journaling about my fiber arts practice. I plan on posting different techniques i am studying so you readers can learn along side me. This is a great opportunity for me to be able to log my progress over the year, as well as create more community awareness about fiber arts and the various topics I am passionate about.

I am going to cover a variety of topics such as weaving, sewing, embroidery, knitting, crochet, tapestry, etc. I plan to inform you readers on how to do them! My ultimate goal is to teach. Occasionally I’ll have free patterns uploaded for you to try on your own at home. I encourage you to become involved with fibers, it can be a great outlet and art form.

Our first topic, fiber slashing! (Sewing). I love the texture that this technique beings to the fabric. I am a huge fan of frayed ends and loose threads. This specific piece in the image was inspired by the women’s reproductive system. I am currently taking a women’s health course, which has majorly broadened my perspective. Feminism and fiber arts go hand in hand the more you look into its history. I will write more on this topic later!

In order to to do this technique on your own at home,
1. Lay 1 piece of fabric down
2. Lay a billion different little scraps of fabric on top of the first piece.
3. Layer a top piece of fabric, the same size as the first piece.
4. Sew with a machine around the border of your fabric sandwich, locking your inner fabics inside of a closed pocket.
5. Sew up and down, equally spaced apart, about 1/2 inch. (The wider the stitch gaps, the more fabric will come out when you get to the slashing. A smaller width can make it too small to get the fabric to pull up and out of the slash.
6. Using a seam ripper, CAREFULLY! rip into the top layer of fabric in the in between spaces. Be sure not to accidentally rip all the way through your back panel. If this happens, you may add additional stitching by hand on the back to re-form the support layer. Experiment with ripping into different layers of the fabric, instead of staying at the same depth!
7. Go crazy! Pull as many fibers as you would like to be frayed or pull out which specific colors interest you the most!

I hope everyone enjoyed this week’s first post! I am so excited to continue sharing my practice as well as educate about fiber arts! See you next Fiber Friday!